
本文章项目开源地址:
https://codechina.csdn.net/csdn-django-web/django_kaoshi_demo
系列文章目录
提示:需要下载代码的朋友可以去上面的开源项目库中拉代码,想参与一起学习的同学可以一起加入项目组中开发
零基础学Python Web开发在线考试系统-Django框架入门项目系列课程(真正带你上路玩转实战项目开发)——目录
-
《零基础学Python Web开发在线考试系统-Django框架入门项目第1课-请求和响应(真正带你上路玩转实战项目开发)》
-
《零基础学Python Web开发在线考试系统-Django框架入门项目第2课-模型和管理站点(真正带你上路玩转实战项目开发)》
-
《零基础学Python Web开发在线考试系统-Django框架入门项目第3课-视图和模板(真正带你上路玩转实战项目开发)》
-
《零基础学Python Web开发在线考试系统-Django框架入门项目第4课-表单和通用视图(真正带你上路玩转实战项目开发)》
-
《零基础学Python Web开发在线考试系统-Django框架入门项目第5课-测试(真正带你上路玩转实战项目开发)》
-
《零基础学Python Web开发在线考试系统-Django框架入门项目第6课-静态文件(真正带你上路玩转实战项目开发)》
-
《零基础学Python Web开发在线考试系统-Django框架入门项目第7课-自定义管理站点(真正带你上路玩转实战项目开发)》
提示:大家喜欢的请帮忙一键三连,有问题的朋友可以在评论区留言。
文章目录
- 系列文章目录
- 零基础学Python Web开发在线考试系统-Django框架入门项目系列课程(真正带你上路玩转实战项目开发)——目录
- 前言
- 一、准备工作
- 开发环境的安装:
- Python安装:
- Django安装:
- PyCharm安装:
- 环境安装验证
- 二、开始开发
- 1.数据库配置
- 2.创建模型
- 3.激活模型
- 4.模型API使用
- 5.创建管理员帐号
- 6.启动开发服务器
- 7.创建模型
- 总结
前言
本系列文章的目的:
带你零基础学Python Web开发,并通过真实项目-在线考试系统-来学习如何利用Django框架。
因为知识点比较多,工作量比较大,文章章节就7课时,所以最终实现的功能不多,先实现单选题的功能,
但整个项目下来,会让你真正的上手开发,后期你可以自己按照本系列文章继续添加其他功能。
废话咱就不多说了,下面开始吧,如果中途有问题请在评论区留言或私信联系。
一、准备工作
开发环境的安装:
Python安装:
楼梯在此:https://huidaoli.blog.csdn.net/article/details/121607251
Django安装:
楼梯在此:https://huidaoli.blog.csdn.net/article/details/121607251
或 https://huidaoli.blog.csdn.net/article/details/121465897
PyCharm安装:
楼梯在此:https://huidaoli.blog.csdn.net/article/details/121465897
环境安装验证
若要验证 Django 是否能被 Python 识别,可以在 shell 中输入 python。 然后在 Python 提示符下,尝试导入 Django:
>>> import django
>>> print(django.get_version())
3.2
当然了,你也可能安装的是其它版本的 Django。
二、开始开发
1.数据库配置
下面我们建立数据库,创建我们第一个模型,并使用Django提供的自动生成的管理页面。
下面我们执行下命令:
python manage.py migrate
命令执行结果:
Windows PowerShell
版权所有 (C) 2016 Microsoft Corporation。保留所有权利。
PS F:\Gitee\django_kaoshi_demo\mysite> python manage.py migrate
Operations to perform:
  Apply all migrations: admin, auth, contenttypes, sessions
Running migrations:
  Applying contenttypes.0001_initial... OK
  Applying auth.0001_initial... OK
  Applying admin.0001_initial... OK
  Applying admin.0002_logentry_remove_auto_add... OK
  Applying admin.0003_logentry_add_action_flag_choices... OK
  Applying contenttypes.0002_remove_content_type_name... OK
  Applying auth.0002_alter_permission_name_max_length... OK
  Applying auth.0003_alter_user_email_max_length... OK
  Applying auth.0004_alter_user_username_opts... OK
  Applying auth.0005_alter_user_last_login_null... OK
  Applying auth.0006_require_contenttypes_0002... OK
  Applying auth.0007_alter_validators_add_error_messages... OK
  Applying auth.0008_alter_user_username_max_length... OK
  Applying auth.0009_alter_user_last_name_max_length... OK
  Applying auth.0010_alter_group_name_max_length... OK
  Applying auth.0011_update_proxy_permissions... OK
  Applying auth.0012_alter_user_first_name_max_length... OK
  Applying sessions.0001_initial... OK
有问题的同学可以在评论区留言
2.创建模型
下面我们在来定义下模型,也就是数据库结构设计。
在考试系统中我们需要创建两个模型:题目和选项,其中包括了题目的描述和发布时间等相关内容。
下面开始编辑kaoshi/models.py文件:
from django.db import models


class Question(models.Model):
    question_text = models.CharField(max_length=200)
    pub_date = models.DateTimeField('date published')


class Choice(models.Model):
    question = models.ForeignKey(Question, on_delete=models.CASCADE)
    choice_text = models.CharField(max_length=200)
    votes = models.IntegerField(default=0)
有问题的同学可以在评论区留言
3.激活模型
前面我们已经创建了模型,下面我们开始为这个应用创建数据库schema,也就是生成create table语句,同时还要创建可以进行相互交互的数据库api。
在文件 mysite/settings.py 中 INSTALLED_APPS 子项添加点式路径后。
INSTALLED_APPS = [
    'kaoshi.apps.KaoshiConfig',
    'django.contrib.admin',
    'django.contrib.auth',
    'django.contrib.contenttypes',
    'django.contrib.sessions',
    'django.contrib.messages',
    'django.contrib.staticfiles',
]
我们运行下面命令看看:
python manage.py makemigrations kaoshi
结果将会输出如下:
PS F:\Gitee\django_kaoshi_demo\mysite> python manage.py makemigrations kaoshi
Migrations for 'kaoshi':
  kaoshi\migrations\0001_initial.py
    - Create model Question
    - Create model Choice
下面我们发现多了一个文件,kaoshi/migrations/0001_initial.py
# Generated by Django 4.0 on 2021-12-15 06:58

from django.db import migrations, models
import django.db.models.deletion


class Migration(migrations.Migration):

    initial = True

    dependencies = [
    ]

    operations = [
        migrations.CreateModel(
            name='Question',
            fields=[
                ('id', models.BigAutoField(auto_created=True, primary_key=True, serialize=False, verbose_name='ID')),
                ('question_text', models.CharField(max_length=200)),
                ('pub_date', models.DateTimeField(verbose_name='date published')),
            ],
        ),
        migrations.CreateModel(
            name='Choice',
            fields=[
                ('id', models.BigAutoField(auto_created=True, primary_key=True, serialize=False, verbose_name='ID')),
                ('choice_text', models.CharField(max_length=200)),
                ('votes', models.IntegerField(default=0)),
                ('question', models.ForeignKey(on_delete=django.db.models.deletion.CASCADE, to='kaoshi.question')),
            ],
        ),
    ]
从上面的迁移文件中可以看到模型迁移记录,下面我们来执行迁移并同步数据库。
python manage.py sqlmigrate kaoshi 0001
运行结果如下:
PS F:\Gitee\django_kaoshi_demo\mysite> python manage.py sqlmigrate kaoshi 0001
BEGIN;
--
-- Create model Question
--
CREATE TABLE "kaoshi_question" ("id" integer NOT NULL PRIMARY KEY AUTOINCREMENT, "question_text" varchar(200) NOT NULL, "pub_date" d
atetime NOT NULL);
--
-- Create model Choice
--
CREATE TABLE "kaoshi_choice" ("id" integer NOT NULL PRIMARY KEY AUTOINCREMENT, "choice_text" varchar(200) NOT NULL, "votes" integer
NOT NULL, "question_id" bigint NOT NULL REFERENCES "kaoshi_question" ("id") DEFERRABLE INITIALLY DEFERRED);
CREATE INDEX "kaoshi_choice_question_id_b57a701a" ON "kaoshi_choice" ("question_id");
COMMIT;
现在我们再运行下migrate命令,这样可以完成新定义的模型数据表的创建。
python manage.py migrate
运行结果如下:
PS F:\Gitee\django_kaoshi_demo\mysite> python manage.py migrate
Operations to perform:
  Apply all migrations: admin, auth, contenttypes, kaoshi, sessions
Running migrations:
  Applying kaoshi.0001_initial... OK
通过上面的操作,我们将执行对模型发更改同步到数据库结构上。
4.模型API使用
下面我们开始使用下上面创建的各种api。
命令行如下:
python manage.py shell
具体运行的api命令:
PS F:\Gitee\django_kaoshi_demo\mysite> python manage.py shell
Python 3.9.9 (tags/v3.9.9:ccb0e6a, Nov 15 2021, 18:08:50) [MSC v.1929 64 bit (AMD64)] on win32
Type "help", "copyright", "credits" or "license" for more information.
(InteractiveConsole)
>>> from kaoshi.models import Choice, Question  # Import the model classes we just wrote.
>>> Question.objects.all()
<QuerySet []>
>>> from django.utils import timezone
>>> q = Question(question_text="What's new?", pub_date=timezone.now())
>>> q.save()
>>> q.id
1
>>> q.question_text
"What's new?"
>>> q.pub_date
datetime.datetime(2021, 12, 15, 7, 11, 16, 571639, tzinfo=datetime.timezone.utc)
>>> q.question_text = "What's up?"
>>> q.save()
>>> Question.objects.all()
<QuerySet [<Question: Question object (1)>]>
接着我们来为Question 和 Choice 增加 str() 方法:
from django.db import models


class Question(models.Model):
    question_text = models.CharField(max_length=200)
    pub_date = models.DateTimeField('date published')

    def __str__(self):
        return self.question_text

class Choice(models.Model):
    question = models.ForeignKey(Question, on_delete=models.CASCADE)
    choice_text = models.CharField(max_length=200)
    votes = models.IntegerField(default=0)

    def __str__(self):
        return self.choice_text
我们给模型添加一个自定义方法试试:
import datetime

from django.db import models
from django.utils import timezone

class Question(models.Model):
    question_text = models.CharField(max_length=200)
    pub_date = models.DateTimeField('date published')

    def __str__(self):
        return self.question_text

    def was_published_recently(self):
        return self.pub_date >= timezone.now() - datetime.timedelta(days=1)

class Choice(models.Model):
    question = models.ForeignKey(Question, on_delete=models.CASCADE)
    choice_text = models.CharField(max_length=200)
    votes = models.IntegerField(default=0)

    def __str__(self):
        return self.choice_text
为了看到 效果,我们再执行下交互式命令:
python manage.py shell
具体过程如下:
PS F:\Gitee\django_kaoshi_demo\mysite> python manage.py shell
Python 3.9.9 (tags/v3.9.9:ccb0e6a, Nov 15 2021, 18:08:50) [MSC v.1929 64 bit (AMD64)] on win32
Type "help", "copyright", "credits" or "license" for more information.
(InteractiveConsole)
>>> from kaoshi.models import Choice, Question
>>> Question.objects.all()
<QuerySet [<Question: What's up?>]>
>>> Question.objects.filter(id=1)
<QuerySet [<Question: What's up?>]>
>>> Question.objects.filter(question_text__startswith='What')
<QuerySet [<Question: What's up?>]>
>>> from django.utils import timezone
>>> current_year = timezone.now().year
>>> Question.objects.get(pub_date__year=current_year)
<Question: What's up?>
>>> Question.objects.get(id=2)
Traceback (most recent call last):
  File "<console>", line 1, in <module>
  File "C:\Users\Administrator\AppData\Roaming\Python\Python39\site-packages\django\db\models\manager.py", line 85, in manager_metho
d
    return getattr(self.get_queryset(), name)(*args, **kwargs)
  File "C:\Users\Administrator\AppData\Roaming\Python\Python39\site-packages\django\db\models\query.py", line 439, in get
    raise self.model.DoesNotExist(
kaoshi.models.Question.DoesNotExist: Question matching query does not exist.
>>> Question.objects.get(pk=1)
<Question: What's up?>
>>> q = Question.objects.get(pk=1)
>>> q.was_published_recently()
True
>>> q = Question.objects.get(pk=1)
>>> q.choice_set.all()
<QuerySet []>
>>> q.choice_set.create(choice_text='Not much', votes=0)
<Choice: Not much>
>>> q.choice_set.create(choice_text='The sky', votes=0)
<Choice: The sky>
>>> c = q.choice_set.create(choice_text='Just hacking again', votes=0)
>>> c.question
<Question: What's up?>
>>> q.choice_set.all()
<QuerySet [<Choice: Not much>, <Choice: The sky>, <Choice: Just hacking again>]>
>>> q.choice_set.count()
3
>>> c = q.choice_set.filter(choice_text__startswith='Just hacking')
>>> c.delete()
(1, {'kaoshi.Choice': 1})
>>>
有问题的同学可以在评论区留言
5.创建管理员帐号
为了能登录到管理后台,我们下面通过命令行来创建管理员帐号:
命令如下:
python manage.py createsuperuser
创建过程:
PS F:\Gitee\django_kaoshi_demo\mysite> python manage.py createsuperuser
Username (leave blank to use 'administrator'): admin
Email address: admin@sw.com
Password:
Password (again):
The password is too similar to the username.
This password is too short. It must contain at least 8 characters.
This password is too common.
Bypass password validation and create user anyway? [y/N]: y
Superuser created successfully.
通过上面的操作,已经创建了用户名和密码都是admin的帐号。
有问题的同学可以在评论区留言
6.启动开发服务器
有问题的同学可以在评论区留言
7.创建模型
经过上面的操作,我们已经创建了数据库,数据表,并创建了管理员帐号,下面我们进行后台看看。
启动服务器命令:
python manage.py runserver
启动结果:
PS F:\Gitee\django_kaoshi_demo\mysite> python manage.py runserver
Watching for file changes with StatReloader
Performing system checks...

System check identified no issues (0 silenced).
December 15, 2021 - 15:26:14
Django version 4.0, using settings 'mysite.settings'
Starting development server at http://127.0.0.1:8000/admin
Quit the server with CTRL-BREAK.
我们开始访问http://127.0.0.1:8000/看看。

登录成功后的后台首页:

有问题的同学可以在评论区留言 ## 8.向管理后台添加应用 在后台我们没有找到我们的应用,下面我们来添加应用到后台。
修改文件kaoshi/admin.py
from django.contrib import admin

from .models import Question

admin.site.register(Question)
后台刷新下,应用出来了:

有问题的同学可以在评论区留言 ## 9.使用下考试应用功能 下面我们来使用下我们的考试功能 找到我们的试题 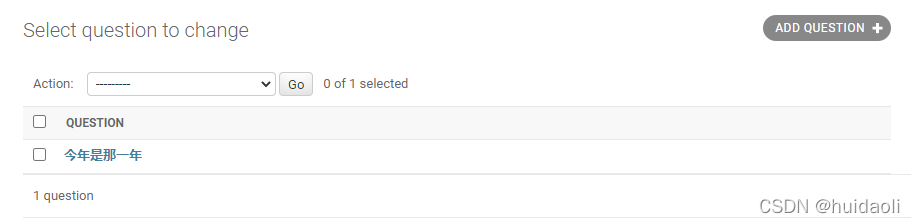
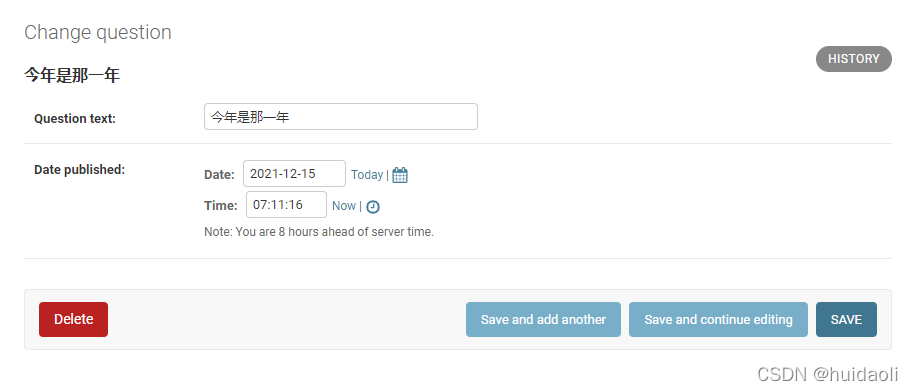
下面来编辑下这个题目:
有问题的同学可以在评论区留言
总结
到这里今天的内容就讲到这了,通过上面的学习我们学会了给我们的应用添加数据库表,并设置管理帐号,同时熟悉了后台管理功能,并对我们的考试题目进行了简单的编辑,大家如果有什么问题可以评论区留言,我们下篇文章再见。